

Local development for the cloud: Transitioning to .NET Aspire
I’ve been working on a new project recently. It requires that I work with microservices and containers as it will eventually be runnable on either Kubernetes or (more likely) Azure Container Apps. My latest bit is to get ASP.NET identity working with PostgreSQL. And here lies a problem. In order to properly debug the code, I need the ASP.NET bits to be running locally. But to integrate with PostgreSQL, I need to set up containers and docker compose. This all feels like work.
Wouldn’t it be amazing if I could write the same code and the same orchestration and run this locally, then deploy it to the cloud?
Well, that facility is available in the dotnet world. It’s called Aspire. The short version is that Aspire is a cloud ready stack for building applications that ALSO allows you to do local development easily. If you want to get a primer before diving in, check out this video then check out this playlist - it goes into some depth. I’m going to be concentrating on the minimum needed to get my solution working.
If you are impatient, check out the GitHub repository.
Starting with an application
This article is not really about identity. As it happens, I was playing with ASP.NET Identity when I started this journey to Aspire, so let’s start there. However, if you have a different application, just jump ahead to the next section.
If you’re still with me, let’s start with a basic MVC application:
dotnet new sln -n identity
dotnet new mvc -n Samples.Identity
dotnet sln add .\identity.sln .\Samples.Identity\Samples.Identity.csproj
This scaffolds up a new MVC application in a new solution file. You can open the solution file in Visual Studio Code or Visual Studio. I’m using Visual Studio for this article as I think the Aspire integration is just a bit better. Next step is to scaffold the identity pages. Did you know you can add ASP.NET identity to an existing app? Did you know it almost always ends in extra work to correct the mistakes?
Let’s start with scaffolding. Right-click on the project, then select *Add** > New Scaffolded item…, go through the wizard, and add all the identity pieces to your application. You don’t have a DbContext yet, so pick one and don’t worry too much about it as we will be replacing it.
Some notes:
- The pages are in
Areas/Identity/Pagesfolder, but the HTTP pipeline isn’t set up for it. I moved this directory into the top level of the project, then used Edit > Find and Replace > Replace in Files to replace all the occurrences ofSamples.Identity.Areas.IdentitywithSamples.Identityto get rid of the area. I also needed to add Razor Pages support to the pipeline. - Similarly, the created database context is wrong - just delete the entire
Areas/Identitydirectory once yourPagesfolder is moved.
Next, I created a Data folder with three files. First up is my ApplicationDbContext class:
using Microsoft.AspNetCore.Identity.EntityFrameworkCore;
using Microsoft.EntityFrameworkCore;

namespace Samples.Identity.Data;

public class ApplicationDbContext(DbContextOptions<ApplicationDbContext> options) : IdentityDbContext(options)
{
}
Yep - it’s empty. If I were going to be using this database for other things aside from the identity tables, I could add them here. My long term intent, however, is to make this project an OIDC identity server for the microservices, so I don’t actually want any extra tables here. Optionally, I could include some extra fields by specifying a new ApplicationUser class, but I’m just doing the basics for right now.
Next is an IDbInitializer and ApplicationDbInitializer class. Basically, when in development, you want the database to be updated on a regular basis. When it’s in production, you will want to use SQL scripts or migrations to ensure the schema of the database doesn’t destroy data. That’s just not important in development. As a result, I use a database initializer that just “does the right thing”.
namespace Samples.Identity.Data;

public interface IDbInitializer
{
    Task InitializeDatabaseAsync(CancellationToken cancellationToken = default);
}

public class ApplicationDbInitializer(
    ApplicationDbContext context,
    IWebHostEnvironment env,
    UserManager<IdentityUser> userManager,
    RoleManager<IdentityRole> roleManager
    ) : IDbInitializer
{
    public async Task InitializeDatabaseAsync(CancellationToken cancellationToken = default)
    {
        // If this is in development, then create the database.
        // If not, you should be doing this externally via migrations or SQL scripts.
        if (!env.IsDevelopment())
        {
            return;
        }

        await context.Database.EnsureCreatedAsync(cancellationToken);
        await SeedUsersAndRolesAsync(cancellationToken);
    }

    // Rest of the database initializer goes here
}
I haven’t included the database initializer here, but check out the full source code - I’ve made the code as readable as I can. However, it basically creates a list of roles, then a list of users, then adds users to roles. I’ve included methods for each one.
Finally, I updated the Program.cs:
using Samples.Identity.Extensions;

var builder = WebApplication.CreateBuilder(args);

builder.AddDatabase();
builder.AddAspNetIdentity();
builder.Services.AddControllersWithViews();
builder.Services.AddRazorPages();

var app = builder.Build();

await app.InitializeDatabaseAsync();

app.UseHttpsRedirection();
app.UseStaticFiles();
app.UseRouting();

app.UseAuthorization();
app.MapDefaultControllerRoute();
app.MapRazorPages();

app.Run();
There are three extension methods, which you can put wherever you want. The first is for the “non-Aspire” version of AddDatabase():
public static void AddDatabase(this IHostApplicationBuilder builder)
{
    var connectionString = builder.Configuration.GetConnectionString("DefaultConnection");
    builder.Services.AddDbContext<ApplicationDbContext>(options => {
        options.UseNpgsql(connectionString);
        // Other options here.
    });
    builder.Services.AddScoped<IDbInitializer, ApplicationDbInitializer>();
}
The second is to add ASP.NET Identity:
public static void AddAspNetIdentity(this IHostApplicationBuilder builder)
{
    builder.Services
        .AddIdentity<IdentityUser, IdentityRole>(options => options.SignIn.RequireConfirmedAccount = true)
        .AddEntityFrameworkStores<ApplicationDbContext>();
}
Finally, the database initializer:
public static async Task InitializeDatabaseAsync(this WebApplication app)
{
    using IServiceScope scope = app.Services.CreateScope();
    IDbInitializer initializer = scope.ServiceProvider.GetRequiredService<IDbInitializer>();
    await initializer.InitializeDatabaseAsync();
}
And doubly-finally - much later in the process, I found that the logic in the Pages/Account/Login.cshtml.cs for logging in a user wasn’t quite right. The page they provide asks for an email address but only supports a username. It only works as written if the username is an email address. I adjusted OnPostAsync() to allow either email or username. You can see my changes starting at line 102 of the code.
Adding Aspire to the project
I’m not ready to run this yet. I don’t have a database server. I don’t want to be running a database server on my local machine since I have too many projects. This is definitely a place where containers get the job done. So let’s add Aspire to this project.
Right-click the project, then select Add > .NET Aspire Orchestrator Support… and go through the wizard (you can just click next).
At this point, Visual Studio will create two new projects - an AppHost and a ServiceDefaults project. Most of the work is done within the AppHost. The ServiceDefaults project is linked into each service you are writing. The AppHost stands alone. It is where you configure the services you want to use.
I find it useful to create an
Aspiresolution folder and move the two Aspire projects there.
Before we go on, take a look at the identity projects Program.cs. Two new lines have been added. In the service setup section, builder.AddServiceDefaults() has been added. Then, after the application has been created, app.MapDefaultEndpoints() has been added. These bring in important cross-service concerns like telemetry and health montitoring into your services.
Add PostgreSQL to your orchestration
Now, let’s look at the AppHost project. At first, it doesn’t look like much - just a builder that adds a project. However, I want to add a database service to the solution, and I don’t want to manage it. Start by adding the Aspire.Hosting.PostgreSQL to the AppHost project. You can do this with the normal NuGet package manager or you can use Add > .NET Aspire Package… which focuses the NuGet experience on Aspire packages. PostgreSQL is a relatively popular package, so it ends up at the top, but you may need to search for it.
Once added, let’s integrate it into the Program.cs for the AppHost:
using Microsoft.Extensions.Hosting;

var builder = DistributedApplication.CreateBuilder(args);

var databaseService = builder.AddPostgres("postgres");
if (builder.Environment.IsDevelopment())
{
    databaseService.WithPgWeb();
}

var identitydb = databaseService.AddDatabase("identitydb");

builder.AddProject<Projects.Samples_Identity>("identityservice")
    .WithReference(identitydb)
    .WithExternalHttpEndpoints();

builder.Build().Run();
There are four bits here:
- First, I add the database service, giving it a symbolic name “postgres”. The name is up to you, but each service must have a unique name.
- Next, I link in PgWeb if I’m in development. This will start a second container that I can access to look at the database.
- Next, I create a database called “identitydb”. Again, the name is up to you, but remember this one as you will refer to the name again. By default, the database name is the same as the symbolic name.
- Finally, I add the identity service. There are two additions - first, I add a reference to the identity database, and secondly, I make the service externally visible.
It’s awfully tempting to move these “magic strings” into a shared project, and Aspire seemingly provides the ServiceDefaults project for you for just this sort of thing. This makes the magic strings common across all projects, so it’s a no-brainer, right? Unfortunately, ServiceDefaults doesn’t work like that. Yes, it’s a shared project, but you can’t add the ServiceDefaults to the AppHost to use the static class.
Now, how does the identity service know where to look for the identity database? Well, we have to link in Aspire into the project and tell it the symbolic name. First, off add the Aspire.Npgsql.EntityFrameworkCore.PostgreSQL package from NuGet. Again, you can use Add > .NET Aspire Package… for a filtered list.
Make sure the versions of all the Aspire packages match. At time of writing, that is 8.2.0. You may also need to run
dotnet workload updateand restart Visual Studio if you update the version of Aspire.
Next, let’s replace the AddDatabase() extension method:
public static void AddDatabase(this IHostApplicationBuilder builder)
{
    builder.AddNpgsqlDbContext<ApplicationDbContext>("identitydb", configureDbContextOptions: options =>
    {
        if (builder.Environment.IsDevelopment())
        {
            options.EnableDetailedErrors();
            options.EnableSensitiveDataLogging();
            options.EnableThreadSafetyChecks();
        }
    });

    builder.Services.AddScoped<IDbInitializer, ApplicationDbInitializer>();
}
Instead of builder.Services.AddDbContext, you use builder.AddNpgsqlDbContext. Instead of a connection string, you use the symbolic name for the database. Finally, if you need to configure the DbContextOptions, you can still do it, but it looks a little different. As an example, I add detailed error tracking and log sensitive data in development mode.
Running Aspire for the first time
Now I am ready to run the project for the first time. Visual Studio made the AppHost the default startup project when you added Aspire to the solution. First, make sure Docker Desktop is running. You should just be able to press F5 and see it launch. A web console will pop up!
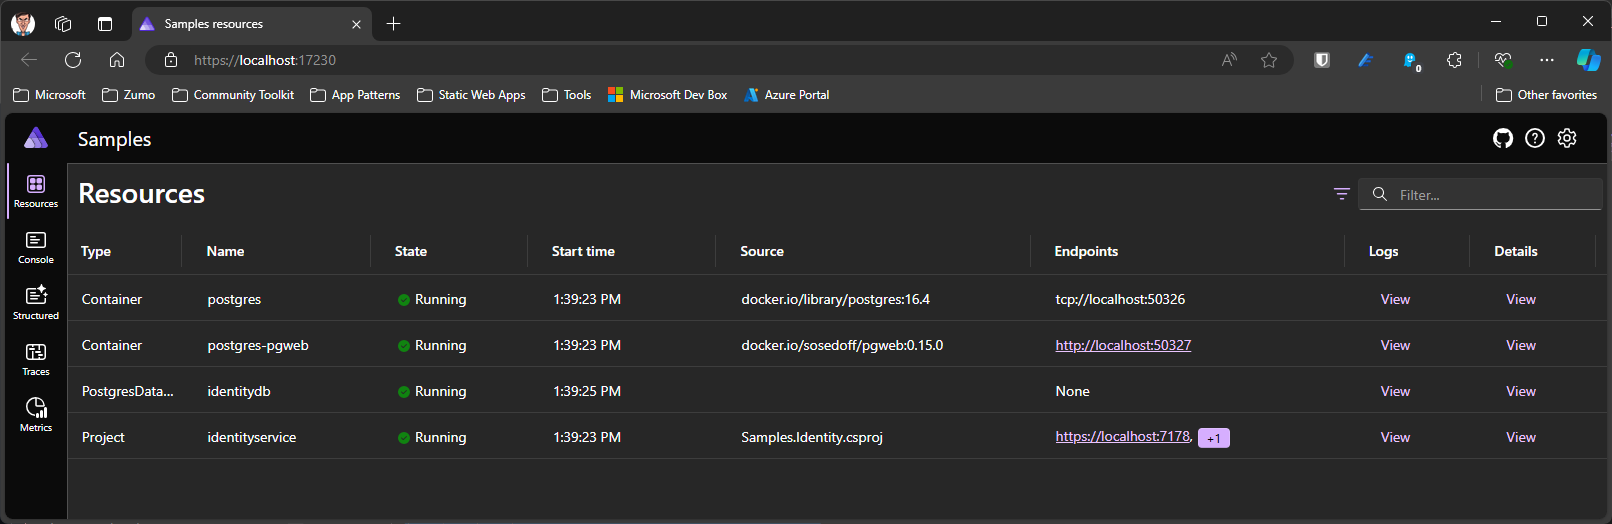
Ok - it won’t look as pretty as this. Two of the services won’t finish starting up (the postgres and identitydb containers) and your application will hit a breakpoint. However, stop your application, then restart it and everything should work fine. The PostgreSQL database service needs to be downloaded from an external resource and it doesn’t happen quickly enough for the ASP.NET service, so it times out.
You’ll see a few URLs that you can click on - the PgWeb URL and both the HTTP and HTTPS URLs for your ASP.NET service are available. You should also be able to log in to your ASP.NET Service. I placed an [Authorize] attribute on the Privacy() route to trigger authentication. Like I said earlier, I bumped into problems where I couldn’t actually enter an email address for the login ID, so I had to adjust the OnPostAsync() method of the Login.cshtml page. To get to that, I was able to set a breakpoint and step through the code, analyzing various variables along the way.
Deploying to the cloud
The local development story for this is already a win for productivity in my books, but where it really shines is when I am ready to deploy to the cloud. The Azure Developer CLI has built in support for Aspire, so you don’t need to know about what infrastructure is needed - it does the right thing.
First, open up a terminal and change directory to the place where your solution file is located. Then, authenticate:
azd auth login
If you are in a particularly secure environment, you may need to use the device code mechanism
azd auth login --use-device-code
This allows you to complete the authentication process on a secured system while still running the azd commands on your dev box. Now, initalize the project:
azd init
Select Use code in the current directory. The Azure Developer CLI will detect an Aspire project, then prompt you to enter an environment name (which is used for naming resources, including the resource group where all the resources are located). To deploy to Azure, run azd up:
azd up
You will be prompted for a subscription a region when you run azd up the first time for the project.
There are many things I like about Aspire, but one of the significant ones is how much Azure work it does for you. Technically, you are deploying your application to an Azure Container Apps environment. Here is what is deployed:
- An Azure Container Register, for storing container images.
- An Azure Container Apps environment, for running the containers.
- A Log Analytics Workspace, for operational telemetry.
- A Managed Identity, so you don’t have to worry about credentials.
- The Aspire Dashboard, so you get easy access to all your resources.
You didn’t have to write a single line of IaC for this functionality.
Persisting data
One of the things that caught me out was data persistence. The data within PostgreSQL lasts as long as the container does unless you do something special. You can do one of two things:
- Use a data volume
- Use an Azure Flexible Server instead of a container
Let’s look at each one:
The Data Volume
Many Aspire resources require data persistence. It’s so common that there is a standard method of attaching a data volume to such containers. In the AppHost, you can configure the service like this:
var database = builder.AddPostgres("postgres")
    .WithDataVolume();
However, that isn’t enough. Every time the host starts, a new random password is generated unless you tell the application not to. When you are using persistent volumes, you need to have a static password. To do this, add a parameter:
var sqlPassword = builder.AddParameter("postgresql-password", secret: true);

var database = builder.AddPostgres("postgres", password: sqlPassword)
    .WithDataVolume();
Then use dotnet user-secrets to add Parameters:postgresql-password:
dotnet user-secrets set Parameters:postgresql-password <password>
When you start everything up next time, the PostgreSQL database will have the same admin password and use a persistent data volume.
Using Azure Database for PostgreSQL
Using a data volume is fine for smaller projects. However, if you want more fine-grained control of the database service, or you have higher reliability and scalability requirements than a container can deal with, you’ll want to use Azure Database for PostgreSQL Flexible Server - a mouthful, but it’s Azures managed offering for PostgreSQL. To use this options:
- Add the
Aspire.Hosting.Azure.PostgreSQLNuGet package to your AppHost. - Update your database definition to call
PublishAsAzurePostgresFlexibleServer:
var database = builder.AddPostgres("postgres")
    .PublishAsAzurePostgresFlexibleServer();
You don’t need to worry about persistent passwords or data volumes in this case. When you deploy to Azure, the flexible server will be created for you. When running locally, a container version of PostgreSQL will be used.
Want more fine-grained control of what happens? The builder has an
ExecutionContextwhich shows when the AppHost is publishing (e.g. to Azure) or running (e.g. locally). You can adjust what happens along two different dimensions - theASPNETCORE_ENVIRONMENTand whether publishing or running the application. You can also create a bicep resource instead (using the ExecutionContext to distinguish between local and Azure) and get specific about what settings you want on the Azure service.
Final thoughts
As you can imagine, I’m all-in on Aspire for multi-service projects. Aspire can automatically link in a wide variety of Azure services for me and I can run them both locally and in the cloud with the same code. In terms of productivity, this is a major win. Aspire is an opinionated stack. It expects all the services to be in the same repository, doesn’t like data isolation (VNETs, NSGs, etc.) yet, and has some other quirks (like the inability for ServiceDefaults to be used in the AppHost) that should get ironed out over time. For such a young framework, it’s already increased my productivity as I develop cloud-native applications.
One of the big benefits it brought along with it is a mental model. When I started with cloud-native development, I had to learn Kubernetes. I don’t like it. Kubernetes is a complex beast that has no real advantages in the majority of development situations. Sure, it’s probably great for running complex production workloads. But for development? Switching to Aspire allows me to not worry about what is happening on the Kubernetes side of things. I can finally just concentrate on my code.


Leave a comment