

.NET Aspire configuration patterns
If you recall my last article, I transitioned my working application to .NET Aspire. This opinionated pattern allows me to run a complete microservice application within Docker Desktop, but then seamlessly deploy to Azure Container Apps and other platform services with the same code base. I don’t need to worry about where my database is going to be - it’s done for me. This is a great productivity boost for a developer.
My current project builds an OIDC identity service that has both username/password (local) authentication and social logins like Google and Facebook. To properly set this up, I need to store configuration for my application. I need to store the client ID and client secret for the OIDC connections to the social media sites (more on that in another article). In the cloud world, I want to make sure I protect the client secret so that only authorized applications can view it.
However, I still want local development to work without relying on cloud resources. So, how do I do that?
First set up a project
I started this investigation by setting up a new project (which you can find in my samples repository). The basic instructions here:
- Create an MVC Web App and make sure it works.
- Adjust the
Views/Home/Index.cshtmlview to display the configuration (more on that later). - Add Aspire using Add > .NET Aspire Orchestration…
- Run the application locally to ensure everything is working.
My Index.cshtml file looks like this:
@using Microsoft.Extensions.Configuration
@inject IConfiguration Configuration
@{
    ViewData["Title"] = "Home Page";
}

<div class="text-center">
    <h1 class="display-4">Configuration</h1>
</div>
<section id="configSection">
    <pre>@Html.Raw(((IConfigurationRoot)Configuration).GetDebugView())</pre>
</section>
This displays the debug view for configuration, which is meant to be human readable and tells you the source of each configuration element.
Finally, I added user secrets to the MVC application, and added the following to my user secrets:
{
  "AspireConfig": {
    "source": "webapp-usersecrets"
  }
}
Run the application (now in Docker Desktop), and launch the web app. You will see that there is an AspireConfig section with a source of “webapp-usersecrets”.
We now have a mechanism for introducing secrets into our configuration when developing locally - use user secrets.
Configuration in the cloud
When operating in the cloud, you could just use environment variables. In fact, this is how Aspire links referenced resources to services normally. However, this has two problems:
- You have to re-deploy the app to change the secret.
- You have to introduce the secret to the AppHost, increasing the likelihood that your secrets will either not be inserted or will be checked into source code control.
Fortunately, Azure has platform services that solve this problem. Use Azure App Configuration and Azure Key Vault for centralized configuration and storage of secrets.
Azure App Configuration integrates directly into the IConfiguration mechanism for ASP.NET Core and provides hierarchical namespaces (just like IConfiguration), labeling (so you can distinguish between production and dev keys, for example), automatic point-in-time replay of settings, feature flags, and experimentation capabilities with automated reload of configuration inside your application. It complements Azure Key Vault, which provides secure storage for secrets backed by hardware based encryption. I normally see App Configuration per application deployed with a central Key Vault for all the enterprise secrets.
You can set your AppHost up so that it only deploys App Configuration and Key Vault when publishing to the cloud:
using Aspire.Hosting.Azure;

var builder = DistributedApplication.CreateBuilder(args);

IResourceBuilder<AzureAppConfigurationResource>? appConfig = null;
if (builder.ExecutionContext.IsPublishMode)
{
    appConfig = builder.AddAzureAppConfiguration("appconfig");
    builder.AddAzureKeyVault("keyvault");
}

var svc = builder.AddProject<Projects.SampleWebApp>("samplewebapp")
    .WithExternalHttpEndpoints();
if (appConfig is not null)
{
    svc.WithReference(appConfig);
}

builder.Build().Run();
If you have a central Key Vault service, you can remove the builder.AddAzureKeyVault("keyvault"); line.
Next, deploy your solution:
azd init -e "my-app"
azd up
The azd init command will prompt you for an environment name if you don’t provide one (with the -e option). The azd up command will prompt you for a subscription and region to use if you haven’t previously specified one. This particular application will take approximately 5 minutes to deploy since there are no databases to deploy alongside it.
Permissions in the cloud
The next step I want to show off is how to set up secrets and configuration using these resources. However, before I do that, we have to discuss permissions. Just because you deployed something doesn’t mean you get to read the data inside the resource. Someone (the owner of the tenant, usually) has to explicitly authorize you to read the data in the resource you just created.
As deployed (and at time of writing), the managed identity for the application has permission to read and write the configuration data in both the App Configuration and Key Vault. You can see the permissions by:
- Sign into the Azure Portal
- Select Resource groups, then the resource group for your environment, then the App Configuration resource.
- Select Access control (IAM) from the left-side menu.
- Select the View button in View access to this resource.
There are two permissions that matter:
- App Configuration Data Owner has read/write permissions to the config data.
- App Configuration Data Reader has read-only permissions to the config data.
You can do something similar to the Key Vault. Instead of the data owner / data reader permissions, you have a number of selections. The Key Vault Administrator gives you carte-blanche for modifying the data. However, there are more restrictive permissions - the most appropriate one for this case is Key Vault Secrets User which only allows read access to secrets.
So, you have two things to do here:
- Ensure that the managed identity has only the permissions necessary to read the configuration and secrets. (which is identified as a user-assigned managed identity named
mi-something, wheresomethingis a random sequence of characters). - Give yourself the read/write permissions to each resource (App Configuration Data Owner on the App Configuration resource, and Key Vault Secrets Officer on the Key Vault resource).
For details on how to assign role-based access controls, see the official Azure documentation. Role-based access control changes take approximately 15 minutes to propagate, so give it some time if you run into permission problems.
Add some cloud-based configuration
Next, I’m going to add two configuration elements. The first is a non-secret configuration that is stored only in App Configuration. The second is a secret configuration that is stored in Key Vault. Let’s start with the non-secret version:
- Sign in to the Azure Portal, then select your App Configuration resource.
- Open Operations in the left-side menu, then select Configuration explorer.
- If you see a Permission denied error, review the permissions section above and make sure you have waited 15 minutes.
- Select Create + in the top-bar, then select Key-value.
- Fill in the form:
- Key:
AspireConfig:appconfig - Value:
appconfig-value
- Key:
- Select Apply.
For the secret:
- Select your Key Vault resource.
- Open Object in the left-side menu, then select Secrets.
- If you see a Permission denied error, review the permissions section above and make sure you have waited 15 minutes.
- Select Generate/Import in the top-bar.
- Fill in the form:
- Upload options: Manual
- Name:
Aspire-Secret-Value - Secret value:
keyvault-secret - Enabled: Yes
- Select Create
There are different naming rules between Key Vault and App Configuration. You can’t use a colon in a Key Vault secret name. Now, let’s add a reference to this Key Vault secret in our App Configuration
- Select your App Configuration resource.
- Open Operations in the left-side mentu, then select Configuration explorer.
- Select Create + in the top-bar, then select Key Vault reference.
- Fill in the form:
- Key:
AspireConfig:keyvault - Key Vault: There should only be one, select it.
- Secret: Select the secret you created above.
- Key:
- Select Apply.
You should now have two configuration elements: AspireConfig:appconfig and AspireConfig:keyvault.
Add App Configuration and Key Vault support into your app
Open up the Aspire Dashboard. If you forgot where it is, take a look at the output of azd up - it is displayed once the process is complete. You can always run azd up again to re-deploy. It won’t overwrite your configuration. Once you’ve got your Aspire Dashboard open, open up your application to see the configuration.
There are two specific settings that are important here:
- The
appconfigconnection string tells us where the configuration is. We can use this in our application to add the relevant code to read App Configuration data. - The
AZURE_CLIENT_IDis the GUID for the managed identity. We need this to authenticate with the managed identity to the App Configuration resource.
There is some boiler-plate code you need for this. There are two versions - the basic version is for situations where you just want to update IConfiguration. The second version is more complex (and not covered here) where you want to respond to changes in feature flags.
Before you start, add the following NuGet packages to your project:
Next, add the following extension method:
public static void AddAzureAppConfiguration(this IHostApplicationBuilder builder, string connectionStringName = "appconfig")
{
    string? connectionString = builder.Configuration.GetConnectionString(connectionStringName);
    if (string.IsNullOrEmpty(connectionString))
    {
        return;
    }

    string? clientId = builder.Configuration["AZURE_CLIENT_ID"];
    TokenCredential credential = string.IsNullOrEmpty(clientId)
        ? new DefaultAzureCredential(includeInteractiveCredentials: false)
        : new ManagedIdentityCredential(clientId);

    builder.Configuration.AddAzureAppConfiguration(options =>
    {
        options.Connect(new Uri(connectionString), credential);
        options.ConfigureKeyVault(kv =>kv.SetCredential(credential));
    });
}
Some notes:
- If the connection string is not provided, it means we don’t read the configuration store.
- If
AZURE_CLIENT_IDis not provided, that means that the system-defined managed identity is being used - it’s not an error. We just need to provide a different token credential which is used to authorize the request to App Configuration. - We use the same credential for accessing both App Configuration and Key Vault in this case. You can define multiple user-defined managed identities, each with an explicit permission. I don’t see this as being useful even in highly secure environments. If a hacker has access to the application, it already has the relevant permissions.
As I mentioned earlier, this is the basic version. When you want the more complex versions, you are adjusting the options inside the .AddAzureAppConfiguration() method.
Make sure you add this call into your services builder after the builder.AddServiceDefaults() and before any other calls:
var builder = WebApplication.CreateBuilder(args);

builder.AddServiceDefaults();

// AFTER .AddServiceDefault()
builder.AddAzureAppConfiguration();
// BEFORE ANYTHING ELSE

builder.Services.AddControllersWithViews();
Now, save and redeploy your code with azd up. This will also restart the application in the cloud. When you go to the home page now, you’ll get the following:
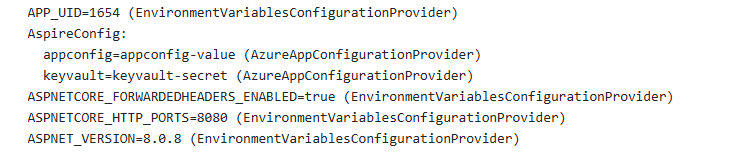
Both of these values come from Azure App Configuration. However, the secret value returns a reference to the Key Vault. When that is received, a second request is made to the Key Vault to retrieve the secret.
Debugging with App Configuration
Sometimes you need to actually use the Azure App Configuration instance. You can do this easily by the following:
- Add a user secret:
ConnectionString:appconfigthat is the URI of your App Configuration instance. You can find this on the overview of your App Configuration resource. - Set
includeInteractiveCredentials: truewhen creating the connection to your App Configuration instance in your web app.
The service connection will use your credentials (as specified via Visual Studio, Visual Studio Code, Azure CLI, or Azure PowerShell) instead of the managed identity to communicate with the App Configuration and Key Vault resources.
Final thoughts
You can and should use centralized configuration when using the cloud. Azure has specific resources for securely storing secrets and mechanisms to ensure only authorized applications and users can access the configuration data. You should also consider whether your application can use some of the other features of App Configuration (like feature flags). I use feature flags when introducing new capabilities so I can turn them off quickly if they cause issues.
But - as with all cloud resources - make sure you are using the principle of least privilege. The managed identity needs minimal permissions to secrets. You can (and should) make sure that the application can only access the secrets that they need to operate. Use an App Configuration resource per application, but centrally store and secure your secrets.


Leave a comment