Dev containers are a developers best friend
If you’ve ever had to rebuild or significantly upgrade your machine in the middle of a project, then you will recognize the pain. You find that some versions of your favorite tools have changed, or you don’t remember the specific build command or tool download location for that one thing you rely on. Dev containers was designed with this in mind. It’s the technology behind Codespaces and supported in Visual Studio Code. In this tutorial, I’ll walk through the steps to create your own dev container specification so you can work on your project whenever and wherever you want.
What is a devcontainer anyway?
Normally, when you clone a repository, you get a working copy of your code and you edit it right in your environment. You likely need the editor and command line on your machine and you have to install all the command line tools you need, which may be quite complex. With a dev container, the project contains a definition of the tools you require. You can spin up a container with all those tools pre-installed and you can just start editing and running your project.
Dev containers simplify and isolate the process of building a machine for your project by using containers.
Give me an example
Ok. This is a new blog. It has a new version of Jekyll, which means a specific version of Ruby as well. I also want to deploy this site to Azure Static Web Apps (the subject of the next blog), so I’m going to need the Azure Static Web Apps CLI, the Azure CLI, and the Azure Developer CLI. I want to pin the versions of each of these tools so that my project “just works”.
If I have a different project which needs some of these tools, I won’t get into a situation where there are conflicts. If another project dictates I use the latest version of a specific tool, it won’t affect this project.
These are all great things, but what’s the catch?
You need a machine that can run Docker Desktop, or you need to pay for Codespaces. While the majority of us have a PC or Mac that can run Docker Desktop, it’s not everyone.
You don’t need to use Docker Desktop if you can’t meet the license requirements for it or you just don’t want to. Other alternatives include podman and Colima (for the Mac). However, they require additional set up within Visual Studio Code and are definitely not for beginners.
Aside from Docker Desktop, you will want to install Visual Studio Code and the dev containers extension
Configure a dev container
I have already got a base project build, but you can add a dev container to anything. It doesn’t have to be Jekyll (as it was in my case). There is only one thing you need to define a dev container - a devcontainer.json file. This lives in the .devcontainers directory of your project. You check it into GitHub (for using Codespaces) along with the rest of your code.
If you need a special container build, you can also specify a Dockerfile - this is strictly optional though.
Let’s look at my devcontainer.json file:
{
    "name": "Jekyll",
    "image": "mcr.microsoft.com/devcontainers/jekyll:2-bullseye",
    "features": {
        "ghcr.io/devcontainers/features/azure-cli:1": {
            "installBicep": true
        },
        "ghcr.io/devcontainers/features/common-utils:2": {},
        "ghcr.io/devcontainers/features/git:1": {},
        "ghcr.io/devcontainers/features/github-cli:1": {},
        "ghcr.io/devcontainers/features/node:1": {},
        "ghcr.io/devcontainers-contrib/features/actions-runner:1": {},
        "ghcr.io/stuartleeks/dev-container-features/azure-cli-persistence:0": {},
        "ghcr.io/azure/azure-dev/azd:0": {}
    },
    "forwardPorts": [ 4000 ],
    "postCreateCommand": "jekyll --version"
}
As you can see, there isn’t much to it. I am using a specific Jekyll container from https://mcr.microsoft.com/ that has Ruby, Jekyll and a lot of common tools around that for me. There is likely an image here that meets your requirements (with a few tweaks).
Those tweaks are included in the features block. You can find a list of all the features available at the https://containers.dev/features site. This site also contains the dev containers specification and the full version of the devcontainers.json format. So, what am I doing here:
- I add
common-utilsto every dev container I produce. It’s main function is providing me with zsh and OhMyZsh - two tools I find necessary for productivity. - I am using
gitandgithub-clito interact with GitHub repositories. Similarly, I useactions-runnerfor running GitHub Actions locally so I can test them. - I need
nodebecause a lot of tools are distributed as JavaScript tools and require node. - Finally, I need a set of tools for dealing with Azure:
azure-cliprovides the access to the Azure CLI.azure-cli-persistencestores your Azure credentials between container rebuilds so you don’t have to re-enter them when you re-build the container.azdis the Azure Developer CLI, that allows me to easily upload my code to Azure with infrastructure already defined.
Each feature has a reason for being on the container that is relevant to this project. I don’t care about adding tooling for other projects - they will never see this dev container.
Aside from the features, there are a few bits of house keeping. Firstly, when I run bundle exec jekyll serve to run my server, it listens on a port - in this case, port 4000. I want to be able to connect to that from my local machine. Forwarding the port to the container allows me to connect to the server via https://localhost:4000.
Finally, there is a postCreateCommand. Right now, this is a place holder. However, you can create a bash script that runs to install anything that isn’t a feature. This can be, for example, any number of tools from the npm repository. Since I am intending on using Azure Static Web Apps, it makes sense to put that installer in here.
Run the dev container
While there are several ways you CAN run a dev container, there are really only two methods I use on a regular basis.
-
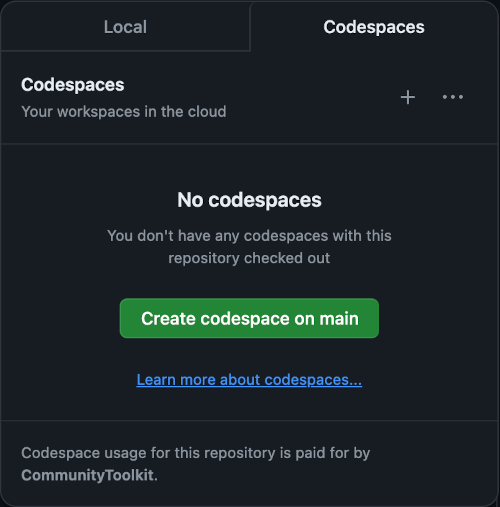
Codespaces is a feature of GitHub that allows you to run a dev container right from the web interface of your repository. Just go to your repository, click on the Code drop down and select the Codespaces tab.

Once you click on the Create codespace on main, the web site will guide you throuhg the process of starting your dev container. Once you are done with it, don’t forget to check in your work and stop the dev container. When you run a dev container in Codespaces, you are billed for the time you are running the container.
-
Visual Studio Code prompts you to re-open your repository inside the container. If you agree, then it will automatically build your container and then re-open your project. The second time opening your project in the container will be much faster since you will already have a container ready to go.
Final thoughts
This blog is written on a Mac in a dev container when I am at home, and on a Windows 11 PC inside a dev container when I am at work. When I have a thought in the evening, I can open my iPad and browse to my codespace on github to immediately add my thought.
Dev containers make this possible, so it’s only right this should be the first blog post on my new blog! I hope you enjoyed the walk through of this technology.
Stay tuned for more developer focused blogs as I develop Apps on Azure. In the next blog, I’ll cover deploying my site to Azure.


Leave a comment