

Enforcing code style with eslint, prettier, and husky
You may have noticed that I am developing a new project from my last couple of articles:
- TypeScript, ES Modules, and root-relative imports
- Building TypeScript projects with the swc compiler
The project is a command line tool written in TypeScript and will be distributed on npmjs.org eventually. I’m still working on the application, so it will be a while before it’s released. Today, I’m continuing my tooling story. How do I enforce code style within my TypeScript application? The go to tools in this area are eslint, prettier, and husky.
I’ve already gotten a good chunk of help in ensuring quality code by using TypeScript. Assuming we set up the project properly with a relatively strict set of TypeScript settings, then our code is going to be better for it. However, code style is also a consistency thing. How do I ensure that the code doesn’t look like ten different people wrote it? Even when I write code on two consecutive days, my own code style may drift.
ESLint is a static analyzer for your code and handles JavaScript, TypeScript, and other JavaScript technologies (like JSX). It’s got a lot of community support behind it and most major editors support it (including Visual Studio Code - my personal favorite). That means you get static analysis feedback right in your editor screen as you type. Yes, there are other static analyzers for the job out there (see jshint, for example). ESLint is so ubiquitous that it’s honestly a waste of time considering anything else at this point.
Prettier is a code formatter. Again, it works with your editor (among other places) to format your code in a non-breaking way. Prettier is not a JavaScript exclusive, but I’ve seen it used in more JavaScript projects than any other project type.
Husky is a mechanism for running code when you are interacting with git, so it’s ideal for enforcing the use of these tools before your code hits the GitHub repository.
These tools work in conjunction with each other so that the code in your code repository is always in your code style and free of the normal coding style issues that can cause hard to diagnose but preventable issues down the road.
What’s a preventable bug?
Let’s take a common issue with JavaScript programs:
function myFunction(x) {
  if (x == false) {
    doSomething();
  }
}
You might think that this is completely valid JavaScript, so where is the problem? Well, that == has some pretty esoteric matching criteria. You are expecting a boolean, but the function accepts anything. Somewhere else in your code, you have the following line:
myFunction([]);
You may be shocked to find out that doSomething() is called in this case. That’s because [] == false in JavaScript land. This is what I term a “preventable bug” - it’s easy to configure eslint to find this sort of thing and do something about it. Normally, I’m using TypeScript. I can add a type to x and I can switch to using ===. The triple-eq requires that the types match as well.
TypeScript settings can ensure your type-checking is up to snuff. Check out the following settings in your tsconfig.json file:
"strict": true,                                      /* Enable all strict type-checking options. */
// "noImplicitAny": true,                            /* Enable error reporting for expressions and declarations with an implied 'any' type. */
// "strictNullChecks": true,                         /* When type checking, take into account 'null' and 'undefined'. */
// "strictFunctionTypes": true,                      /* When assigning functions, check to ensure parameters and the return values are subtype-compatible. */
// "strictBindCallApply": true,                      /* Check that the arguments for 'bind', 'call', and 'apply' methods match the original function. */
// "strictPropertyInitialization": true,             /* Check for class properties that are declared but not set in the constructor. */
// "noImplicitThis": true,                           /* Enable error reporting when 'this' is given the type 'any'. */
// "useUnknownInCatchVariables": true,               /* Default catch clause variables as 'unknown' instead of 'any'. */
// "alwaysStrict": true,                             /* Ensure 'use strict' is always emitted. */
// "noUnusedLocals": true,                           /* Enable error reporting when local variables aren't read. */
// "noUnusedParameters": true,                       /* Raise an error when a function parameter isn't read. */
// "exactOptionalPropertyTypes": true,               /* Interpret optional property types as written, rather than adding 'undefined'. */
// "noImplicitReturns": true,                        /* Enable error reporting for codepaths that do not explicitly return in a function. */
// "noFallthroughCasesInSwitch": true,               /* Enable error reporting for fallthrough cases in switch statements. */
// "noUncheckedIndexedAccess": true,                 /* Add 'undefined' to a type when accessed using an index. */
// "noImplicitOverride": true,                       /* Ensure overriding members in derived classes are marked with an override modifier. */
// "noPropertyAccessFromIndexSignature": true,       /* Enforces using indexed accessors for keys declared using an indexed type. */
// "allowUnusedLabels": true,                        /* Disable error reporting for unused labels. */
// "allowUnreachableCode": true,                     /* Disable error reporting for unreachable code. */
You should think about enabling a lot of these settings. For everything else, there is eslint.
What if I want to use something that is against the code style?
There are almost always cases where the eslint rules cannot be followed, but eslint makes you be deliberate about that case. You can use comments to disable the next line, using the following (as an example)
/* alerting is allowed here because reasons... */
/* eslint-disable-next-line no-alert */
alert('foo');
A couple of notes here:
- I always include a specific rule (or rules) that are being disabled. Being specific is better.
- I also include a reason for the disabling of the rules. This ensures that I remember WHY the rule is disabled when I inevitably return to the code later with zero memory of the reason.
Setting up eslint with prettier
Both eslint and prettier require you to deliberately configure them. Fortunately, there are some sensible defaults you can integrate to simplify the configuration. It comes down to:
- Install prettier and eslint into your project.
- Configure the tools for your requirements.
- Add some scripts so you can run the tools.
- Do an initial run and fix all the inevitable issues.
Let’s look at each of these in turn.
1. Install prettier and eslint into your project
First step - install the dependencies:
npm install -D eslint prettier eslint-plugin-prettier eslint-config-prettier
WARNING: ESlint v9 compatibility with typescript-eslint
typescript-eslint is installed during the next part. The latest version (at time of writing) is v7.x which is not compatible with ESLint v9. Use
typescript-eslintv8.0.0-alpha.51 instead. You will have to install or update this manually.
Eslint comes with a prompted configuration utility:
npm init @eslint/config@latest
I like to start there. My default answers are:
- How would you like to use ESLint? To check syntax and find problems.
- What type of modules does your project use? JavaScript modules (import/export).
- Which framework does your project use? None of these.
- Does your project use TypeScript? Yes.
- Where does your code run? Node.
The only questions here that need thought are the framework (if you are using React or Vue) and browser vs. node. After these questions, there are a couple of confirmation questions to make changes to your project. Then a base eslint.config.js file will be created. I modify this to include prettier and to restrict linting to TypeScript files:
import globals from "globals";
import eslint from "@eslint/js";
import tseslint from "typescript-eslint";
import prettierRecommended from "eslint-plugin-prettier/recommended"

export default [
  {
    files: [
      "**/*.ts"
    ]
  },
  {
    languageOptions: {
      globals: globals.browser
    }
  },
  eslint.configs.recommended,
  ...tseslint.configs.recommended,
  prettierRecommended,
];
If you don’t want to go through the npm init interactive process, you can add the relevant modules to your project:
npm install -D @eslint/js typescript-eslint
Then create the eslint.config.js file as above.
Next, move onto basic configuration of prettier. Both eslint and prettier can use a variety of configuration files. I prefer the .config.js mechanism and try to conform to that where I can. Here is my prettier.config.js file:
export default {
    // Put your prettier configuration here
};
Yes, that’s an empty object. All the settings are chosen by you.
2. Configure the tools for your requirements
Now that I have a basic setup, it’s time to configure it for my requirements. ESLint and Prettier have some good defaults, but they aren’t for everyone. Fortunately, there are two different ways you can configure the rule sets:
- By using a configuration template you download from npmjs.org,
- By going through each rule and making a deliberate decision on it.
I tend to use both. I like code style libraries since someone has done the hard work for me. However, I don’t like all of the style decisions they made. For example, you might want to use eslint-config-standard, which implements the JavaScript Standard Style. Code styles can generate a lot of debate and they are never resolved since they come down to personal preference. I like all lines to have semi-colons at the end. Standard disagrees.
The JavaScript Standard Style is irrelevant to me. I use TypeScript. The typescript-eslint package comes with two shared configurations that I can use:
import globals from "globals";
import eslint from "@eslint/js";
import tseslint from "typescript-eslint";
import prettierRecommended from "eslint-plugin-prettier/recommended"


export default [
  {
    files: [
      "**/*.ts"
    ]
  },
  {
    languageOptions: {
      globals: globals.browser
    }
  },
  eslint.configs.recommended,
  ...tseslint.configs.recommended,
  ...tseslint.configs.strict,
  ...tseslint.configs.stylistic,
  prettierRecommended,
];
There are other shared configurations that typescript-eslint provides. Take a look and decide what works for you. The more opinionated the configuration, the more likely you are going to get consistent code at the end.
Eventually, you are going to come across a rule you don’t agree with. First of all, make sure you are disagreeing with the rule for good reason. Most of the reasons for code style are around consistency - are you being pedantic about something that is important? Most of the time, a consistent code style is more important than any rule. But maybe you have to obey an organizational constraint. You have two choices:
- Create your own shared configuration.
- Put in an exception for the rule.
I’m not going to cover creating your own shared configuration. It involves creating a module with your configuration in it, then going through each rule to set the appropriate settings. It’s good to get a starting point by forking someone elses work, then putting your modifications on top. You then have to maintain that module as new settings get added. It’s not a good use of your time (unless you get paid for it).
However, exceptions are easy. For instance, There is a rule called @typescript-eslint/array-type. It determines if your array types should be T[] or Array<T>. I prefer T[] as the type and I want it to be specific. I can set this up in my eslint.config.js file like this:
export default [
  {
    files: [
      "**/*.{js,ts}"
    ]
  },
  {
    languageOptions: {
      globals: globals.browser
    }
  },
  eslint.configs.recommended,
  ...tseslint.configs.recommended,
  ...tseslint.configs.strict,
  ...tseslint.configs.stylistic,
  prettierRecommended,
  {
    rules: {
        "@typescript-eslint/type-array": [ "error", { "default": "array" }]
    }
  }
];
Each rule is an array. The first element is either “off”, “warn”, or “error”. The second element is the options for the rule, and it can be a number, a string, an array, or an object. Most rules have options, but it’s not required.
Prettier is simpler than eslint. There are several statements inside the object that correlate to options that you can set. You can find the canonical list of options on their website. Prettier also has a great integration with .editorconfig, so you can set up your preferred settings in either file. I like the defaults that prettier brings, so the only thing I set is how semi-colons are treated (see my previous comments on my love of semi-colons). My prettier.config.js file generally looks like this:
export default {
    semi: true
};
3. Add some scripts so you can run the tools
Ideally, I want eslint and prettier to be run automatically when I run my build. I added an additional script to my package.json:
  "scripts": {
    "build": "run-s build:format build:typecheck build:lint build:compile",
    "build:format": "prettier -w ./src",
    "build:typecheck": "tsc",
    "build:lint": "eslint ./src",
    "build:compile": "swc ./src --out-dir dist --strip-leading-paths",
    "clean": "rimraf -fr dist"
  },
The new script is called build:lint and it’s run as part of the build process.
4. Do an initial run and correct all the errors
To test my new configuration, I altered the src/modules/hello.ts so that it contains a bunch of bad code:
let messages = [
    "Hello from the hello module!",
    "Hello from the CLI",
    "This should not be used"
];

export function sayHello(messageId = 1) {
    for (let x = 0; x < messages.length; x++) {
        if (x == messageId) {
            console.log(messages[x]);
            return;
        }
    }
    console.log('Could not find a message ID = ' + messageId);
}
Can you spot all the problems? ESLint can:
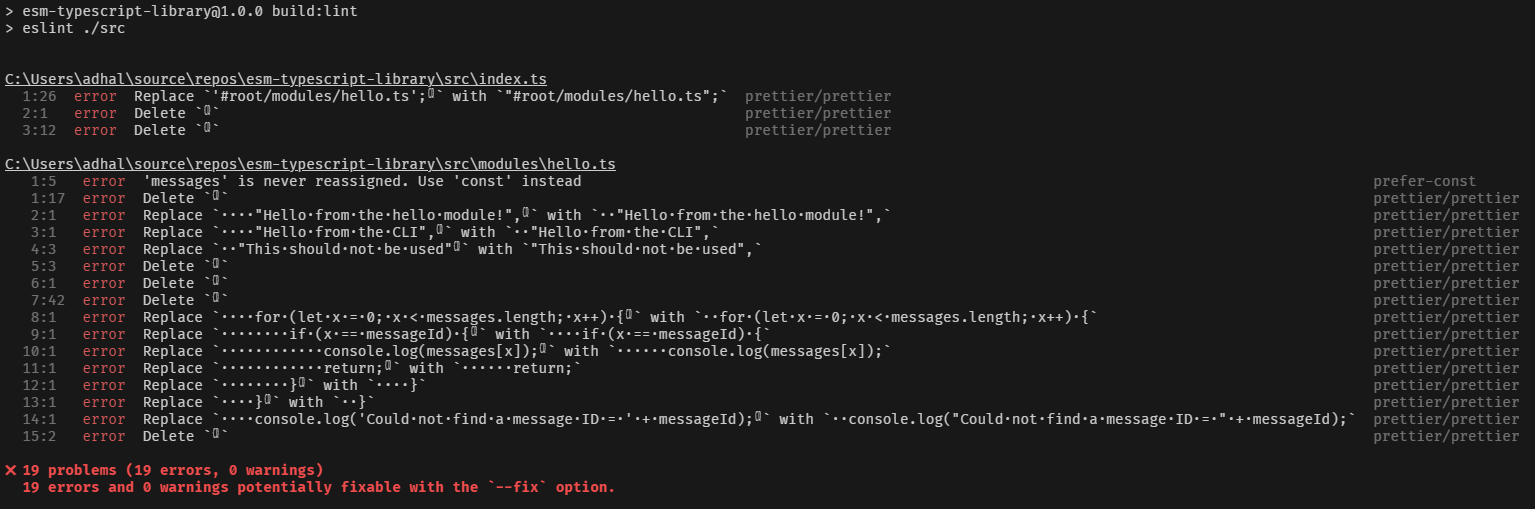
A lot of the output is from prettier. That’s because my .editorconfig file is out of sync with the options within prettier, so the editor hasn’t been following the right rule set. However, I can fix the files using the following command:
npx prettier -w ./src
The -w option means “edit in-place”. I can also update my .editorconfig so that the editor knows what to do:
root = true

[*]
charset = utf-8
end_of_line = lf
insert_final_newline = true
indent_style = tab
indent_size = 2
trim_trailing_whitespace = true
You can take a look at the exhaustive list of options for editorconfig. Prettier and editorconfig work hand in hand. Editorconfig takes care of code formatting in-editor and prettier takes care of code formatter outside of the editor. Most importantly, prettier will use editorconfig as the defaults for its work when a matching option is available.
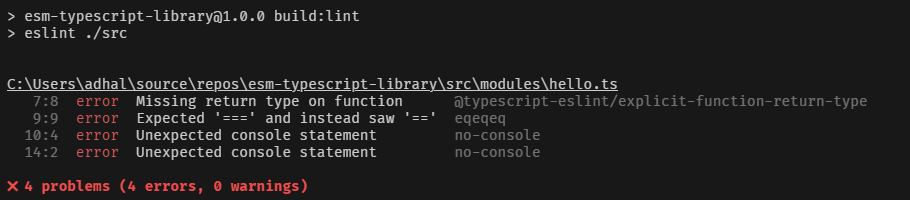
Aside from prettier output, there is one warning about prefering const over let for the definition of messages. However, more importantly (at least for me), it did not detect some of the other options:
- I would like all functions to have a return type. My function did not have a return type.
- There was an
==in the module that was not caught. - There was a
console.login the module that was not caught.
Yes, your linting rules need testing. This is why it’s important to get a solid “shared configuration” baseline for your own exceptions.
There is a “type-checking” version of the eslint ruleset within typescript-eslint that covers most of these. However, I can also adjust them with a rules block in my eslint.config.js file:
  {
    rules: {
        "eqeqeq": [ "error", "always" ],
        "no-console": "error",
        "@typescript-eslint/explicit-function-return-type": "error"
    }
  }
This now throws the appropriate errors:
I can, of course, fix these errors. First, however, let’s see how I can prevent check-ins if there are linting errors.
Setting up husky with eslint and prettier
Husky is a module that automatically runs “stuff” when you do things to your git repository. I want to ensure all my check-ins pass the prettier and eslint gate that I have established. What happens (when husky is properly configured) is that husky is run by git commit. Husky then runs my pre-commit script, which runs eslint and prettier on my code before commiting the changes to git.
Configuring husky
Start by installing husky:
npm install -D husky lint-staged
Alongside husky, I am going to use lint-staged to manage multiple elements (in this case, formatting with prettier followed by linting with eslint). Next, initialize husky:
npx husky-init
This will do several things, including writing out a .husky directory and adding packages to your package.json file. Next, let’s create the appropriate configuration for lint-staged. This is done within the package.json file:
  "scripts": {
    // Rest of the scripts
    "precommit": "lint-staged"
  },
  "lint-staged": {
    "src/**/*.ts": [
      "prettier -w ./src",
      "eslint ./src"
    ]
  }
I can now run npm run precommit to run lint-staged which will run prettier (editing in-place) and then run eslint (reporting any problems). Husky will prevent the check-in from completing if eslint reports any errors.
My final task is to change the pre-commit command. When running npx husky-init, the .husky/pre-commit script was created:
#!/usr/bin/env sh
. "$(dirname -- "$0")/_/husky.sh"

npm test
I need to change that npm command to npm run precommit. Let’s add the code to the repository:
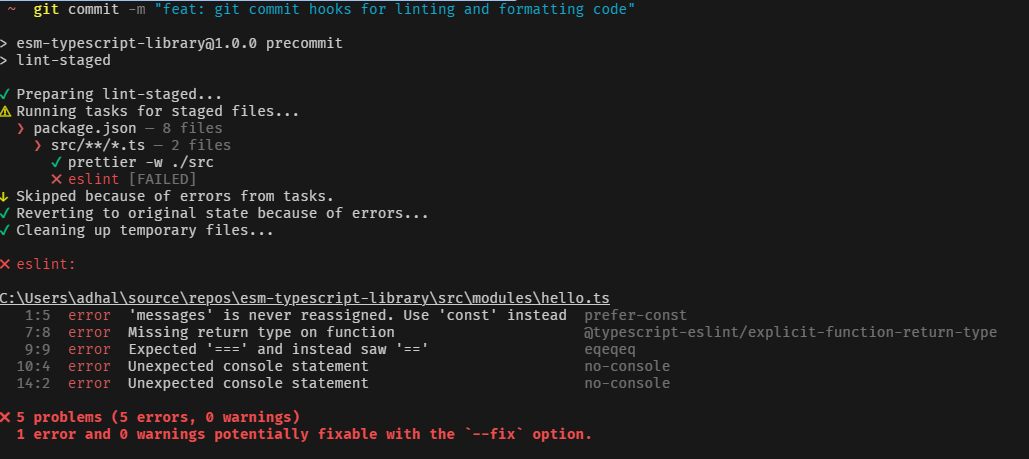
Note that the prettier changes got made first, then eslint was run. As a result, I won’t see any prettier issues but I will see more serious code smells. I can now correct those errors and check in as normal
Final thoughts
I love automation. Most of my libraries and code repositories are updated irregularly so remembering the exact settings I need to use in each case is a real problem for me. Fortunately, being able to codify the static analysis and code formatting rules and then enforce them is a golden way to ensure consistency over years.
My final eslint.config.js was a little different than what is shown above. I enabled strict type-checking and type-checked stylistic shared configurations. I’ve also increased the number of rule overrides as I’ve gone along. Style is personal, so I don’t expect you to agree with me. However, this is more of a starting point rather than a recommendation.
As always, you cand find my repository on GitHub - feel free to beg, borrow, or steal anything in the repository for your own use. I hope you find it useful.


Leave a comment